Development Installing Jira and Confluence on Azure (Again)
Although VERY late, here is my follow-up to my initial post about installing Jira and Confluence. An incredible amount of change has occurred on Azure’s platform (I mean, just take a look at it), and a similar amount seems to have happened in the JIRA/Confluence world. The installation this time around was downright seamless!
I’ve done a brief search, but haven’t found a pre-built image of Atlassian’s tools in the marketplace, but I also didn’t search very hard. However, this doesn’t matter too much, as the installation of both tools are just a few commands away.
Spin up a VM
In the Azure portal, create a new Ubuntu 14.04 LTS VM and let it spin up. I’ll recommend using at least an A2 Basic, because I found that the A1 just didn’t have enough RAM to run either/both JIRA and Confluence (I was waiting minutes for pages to load).
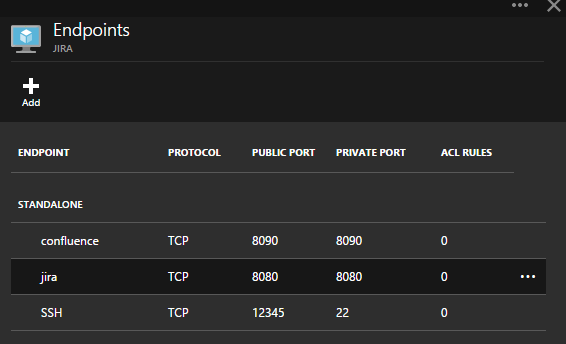
I’m jumping ahead, but when the VM is ready, edit your endpoint selections, and pick external ports for the JIRA and Confluence installation (if you install it as below, JIRA will default to 8080 internally, and Confluence 8090, but you need to expose those to the real world at whatever port you feel).
Preparation
There isn’t too much prep work you need to do on the Linux VMs before installation, but I would always recommend the basics. Harden your Linux installation then update and upgrade your machine.
For Jira and Confluence themselves, the only thing you need is a good database installed. I would recommend either Postgres or MariaDB. For this post, I’ll be using Postgres.
When you install Postgres, a postgres user is automatically created, and your database commands will need to go through it. Just to jump ahead a little, I’ll create a user and database for both JIRA and Confluence. Note: I won’t be diving into securing a Postgres install.
sudo apt-get install -y postgresql-9.3
sudo su postgres

psql -c "CREATE ROLE jirauser LOGIN PASSWORD 'jirapassword'";
psql -c "CREATE DATABASE jiradb OWNER jirauser;

psql -c "CREATE ROLE confuser LOGIN PASSWORD 'confpassword'";
psql -c "CREATE DATABASE confdb OWNER confuser";

exit
Also, as part of this step, we can download both JIRA and Confluence (on Azure, this equates to about 500MB downloaded in 7 seconds for me) and then make them executable (the lucky way - 777).
sudo wget https://www.atlassian.com/software/jira/downloads/binary/atlassian-jira-6.3.11-x64.bin
sudo wget https://www.atlassian.com/software/confluence/downloads/binary/atlassian-confluence-5.6.5-x64.bin
sudo chmod 777 *
Installing JIRA
JIRA’s installation is really straightforward. Download and run.
sudo ./atlassian-jira-6.3.11-x64.bin
During the download process, accept all the defaults unless you have a specific reason not to. Once everything is installed, you can navigate in your browser to your VM’s IP address followed by the public port you picked for JIRA in your Azure endpoint selection (e.g. https://191.236.60.25:8080/).
The following images step through the procedure for selecting a custom database (not the built-in one, which is not intended for production).
[caption id=“attachment_810” align=“aligncenter” width=“619”]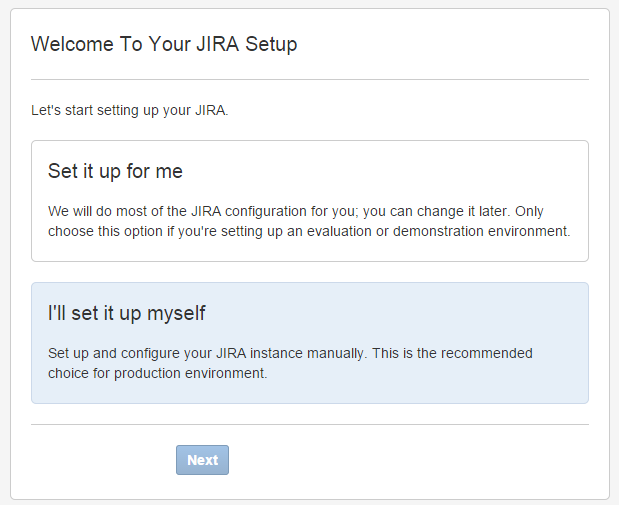 Step 1[/caption]
[caption id=“attachment_811” align=“aligncenter” width=“632”]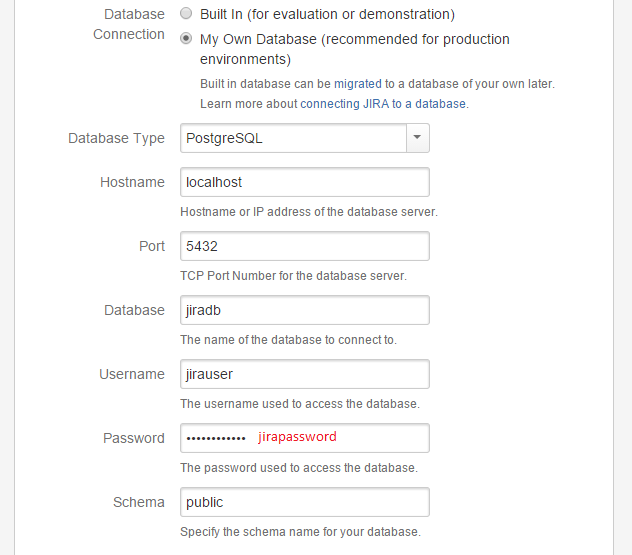 Step 2[/caption]
[caption id=“attachment_812” align=“aligncenter” width=“623”] Step 3[/caption]
Installing Confluence
Confluence is installed very similarly to JIRA.
sudo ./atlassian-confluence-5.6.5-x64.bin
Accept all defaults, and that will get you to an internal setup port of 8090, which you could have pointed wherever in your endpoint settings (I didn’t - 191.236.60.25:8090).
Again, the following images step through installing a custom database for Confluence.
[caption id=“attachment_813” align=“aligncenter” width=“825”]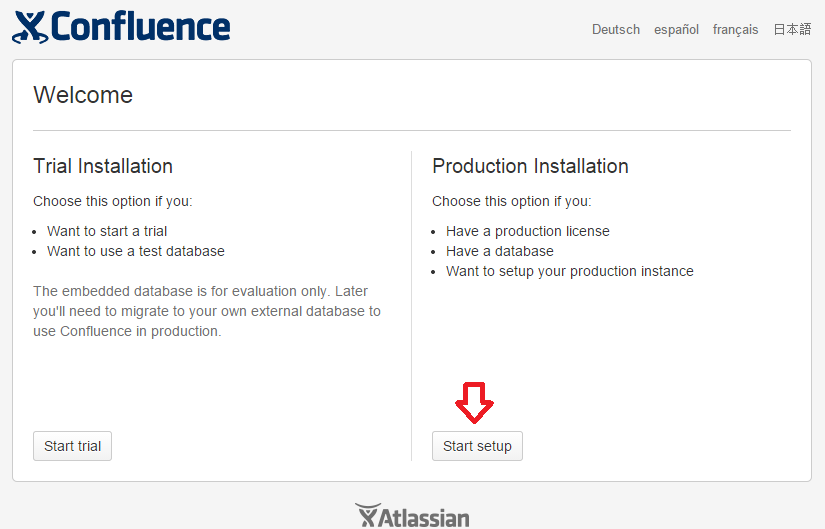 Step 1[/caption]
[caption id=“attachment_814” align=“aligncenter” width=“824”]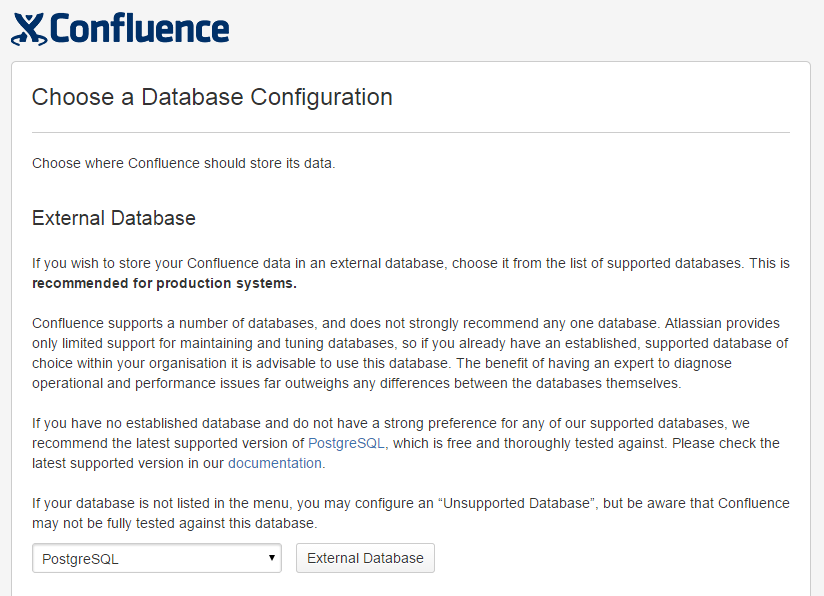 Step 2[/caption]
[caption id=“attachment_815” align=“aligncenter” width=“822”]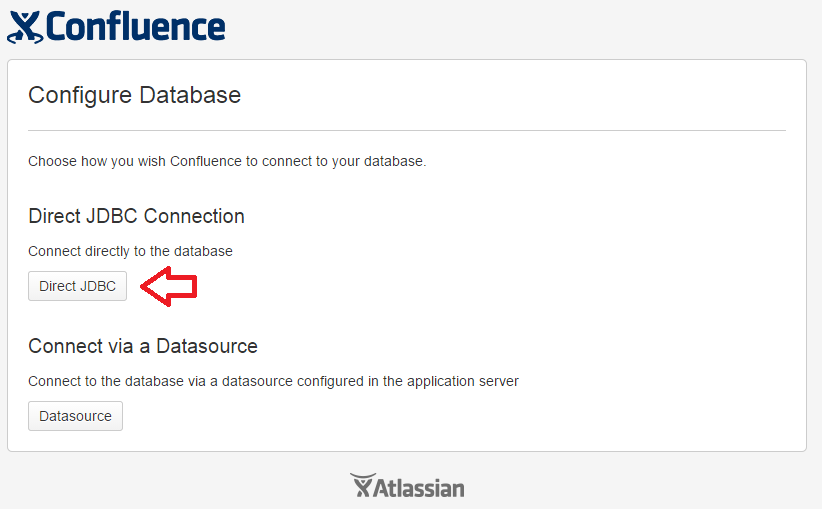 Step 3[/caption]
[caption id=“attachment_816” align=“aligncenter” width=“816”]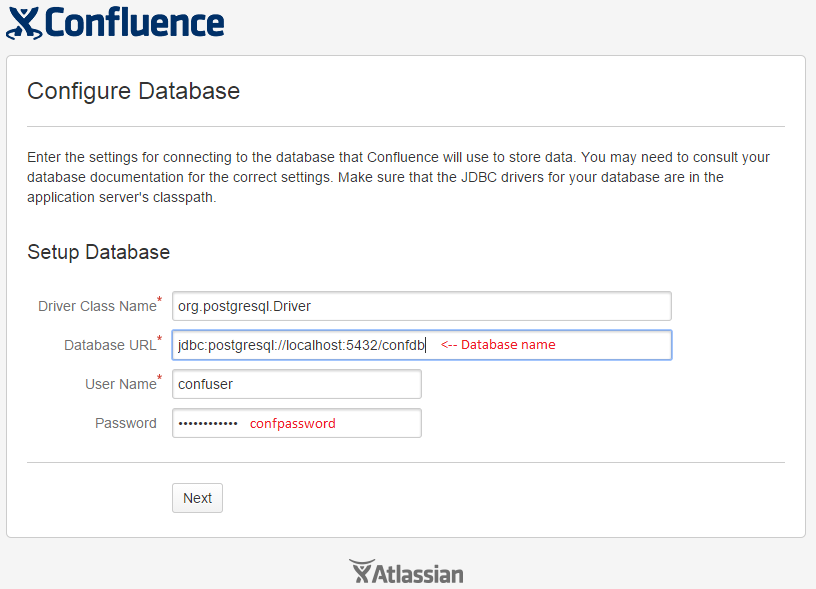 Step 4[/caption]
Sending Mail
I’ve extolled the virtues of SendGrid here already, so I won’t do it again… However, I will use it again.
When I did the JIRA and Confluence thing on Azure the first time, Azure would not let itself be setup as a mail server. I’m not positive, but I believe that changed since I first tried a year or two ago.
Either way, I’m using SendGrid again, because I hate to see my mail (especially pertaining to Wiki updates or project management notifications) sent to spam.
The setup is pretty easy, and I’ve attached an image below that has enough information to set it up. Basically, get into the administrator settings via the gear icon, select “Mail Servers”, “Add a new SMTP mail server”, then fill in the empty boxes with your ‘From’ address, SendGrid’s SMTP settings (smtp.sendgrid.com:587) and then your login credentials.
Once that’s done, send yourself a test email, and if it works, you’re done!
[caption id=“attachment_817” align=“aligncenter” width=“1024”]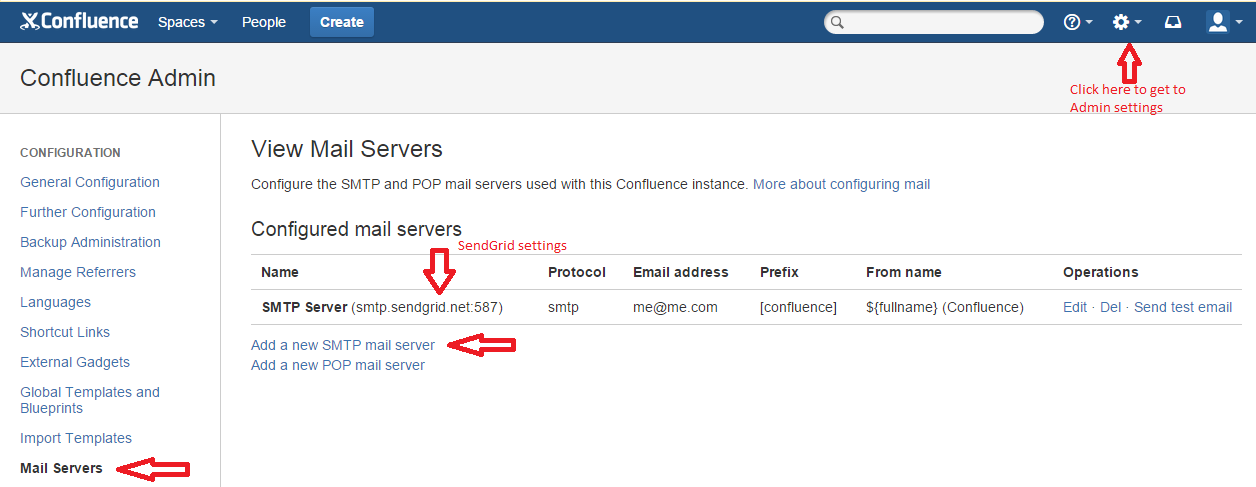 Mail Server Settings[/caption]
Redirect Everything
There is one more thing I would do after the installation, but won’t show here, which is to clean up the URLs for both JIRA and Confluence.
If you have a team, the last thing you’ll want is for them to access their wiki or PM tool at www.mywebsite.com:8090 because everyone forgets port numbers. The other reason is because I’ve found a lot of plugins and tools which expect a clean URL, and just can’t handle adding a port number (they assume 80 or 443).
Even though both JIRA and Confluence install embedded Tomcat webservers, I would nonetheless recommend an nginx install on the server hosting these products, and then using nginx virtual hosts and locations to cleanup the URLs. For example, wiki.mywebsite.com, or maybe www.mywebsite.com/jira (either of those look better than port numbers).
Feature Photo credit: teemow / Foter / CC BY-NC-SA